Official UCalculator CTF Challenge Write-up -- Introduction to Unreal Engine Game Hacking
Detailed write-up for my Reverse Engineering challenge "UCalculator" from 0xL4ugh v5 CTF. This post covers the creation process, Unreal Engine hacking techniques, and the solution.

Hello everyone! 👋 Hope you are doing great.
I am truly honored to have been an author for 0xL4ugh CTF v5, which was a remarkable success.
For this edition, I had the opportunity to craft a unique Reverse Engineering challenge: UCalculator, which got only 1 solve during the 48 hours of the competition. It is likely the first challenge of its kind in the CTF scene, designed specifically as an introduction to Reverse Engineering Unreal Engine 5 Games.
Consequently, this post is not just a standard write-up; it is a comprehensive research and tutorial—hopefully the first of its kind—aimed at teaching the fundamentals of Unreal Engine hacking from the ground up.
Introduction

First of all, Unreal Engine is an open-source game engine made by Epic Games. The fact that it’s open-source allowed the community to make awesome tools and understand its internals, and how games built with Unreal actually work under the hood.
Unreal Engine game structure
Let’s start by understanding the folder structure of a simple Unreal Engine game.
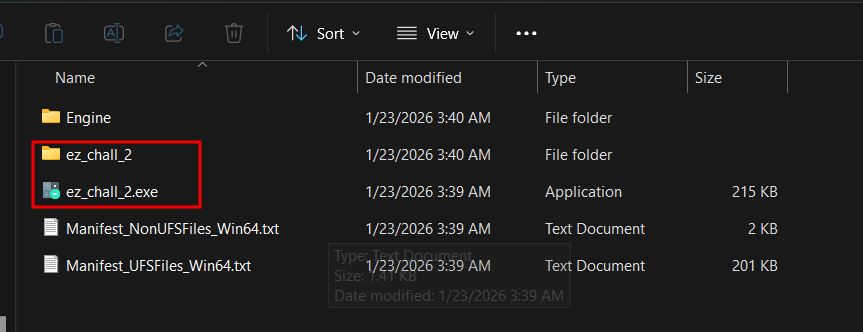
We have the game exe that we can launch the game with, but this is just a wrapper, not the real game exe.
Also, we have the ez_chall folder, which contains all the data we care about.

Inside the Binaries folder lies the real game binary, which contains all the code.
And the Content folder contains all assets needed by the game.
In the Content folder, we can usually expect assets in 2 different formats, either plain content and assets, or the packed format which packs everything inside .pak files.
For .pak files, they will be either left unencrypted and can be unpacked and viewed normally with the correct tools, or they will be AES encrypted so we will need to decrypt them before trying to unpack.
I’ll walk through the .pak thing in detail later, but let’s focus now on the actual game.
How Unreal Engine games use code
Unreal uses its own unique but very powerful blueprints. It’s like its own programming language that looks like just some logic gates connecting to each other without needing to write any code.
But Unreal Engine itself is built on C++, and it has to translate those blueprints to C++ logic at some point. It also supports writing direct C++ code instead of using blueprints, so you can use both of them at the same time and they will work flawlessly.
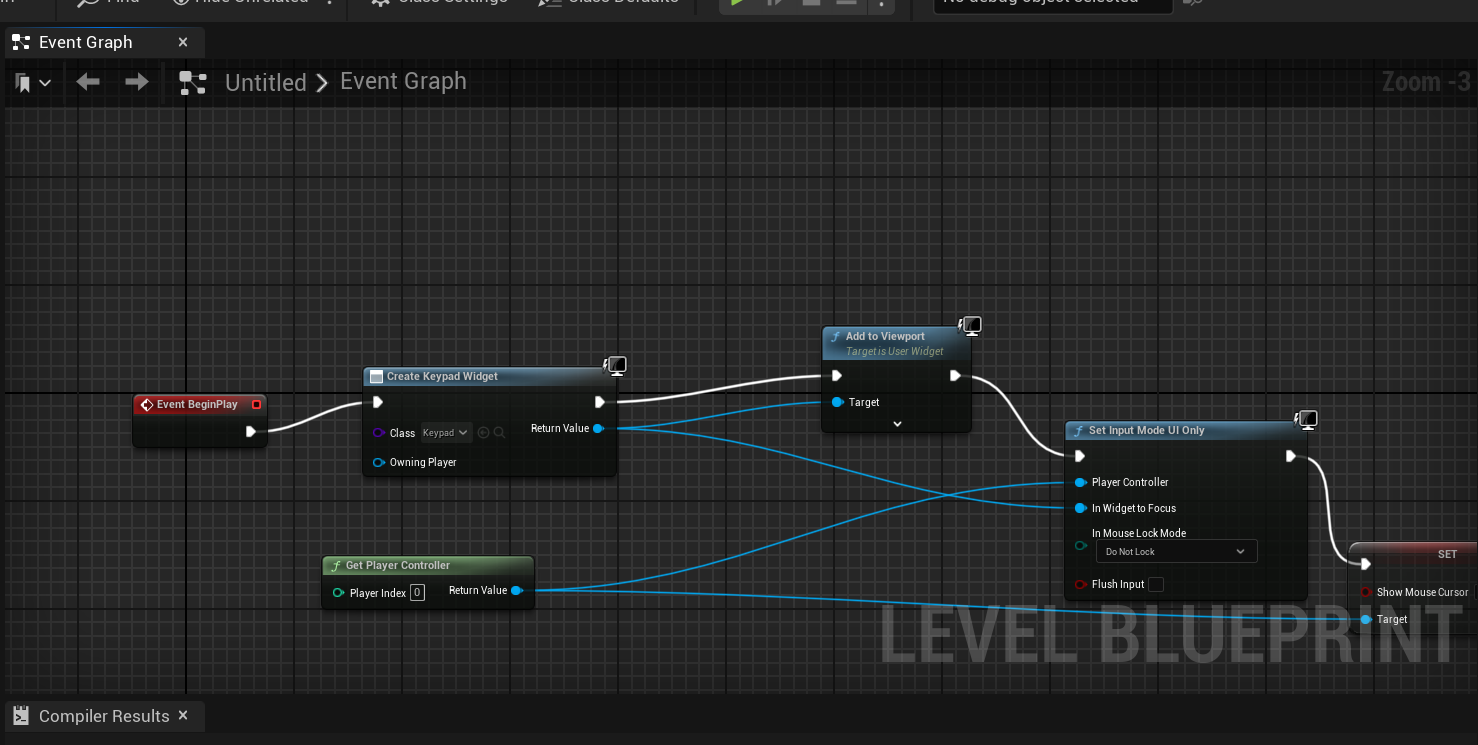 this is what blueprints look like if anyone is interested
For my challenge I have the core logic made in standard C++, and all the code is compiled inside Binaries/Win64/ez_chall_2-Win64-Shipping.exe. This is standard for all Unreal Engine games to have the real exe in this format.
Before opening IDA, let’s start the game first to see what we have here.
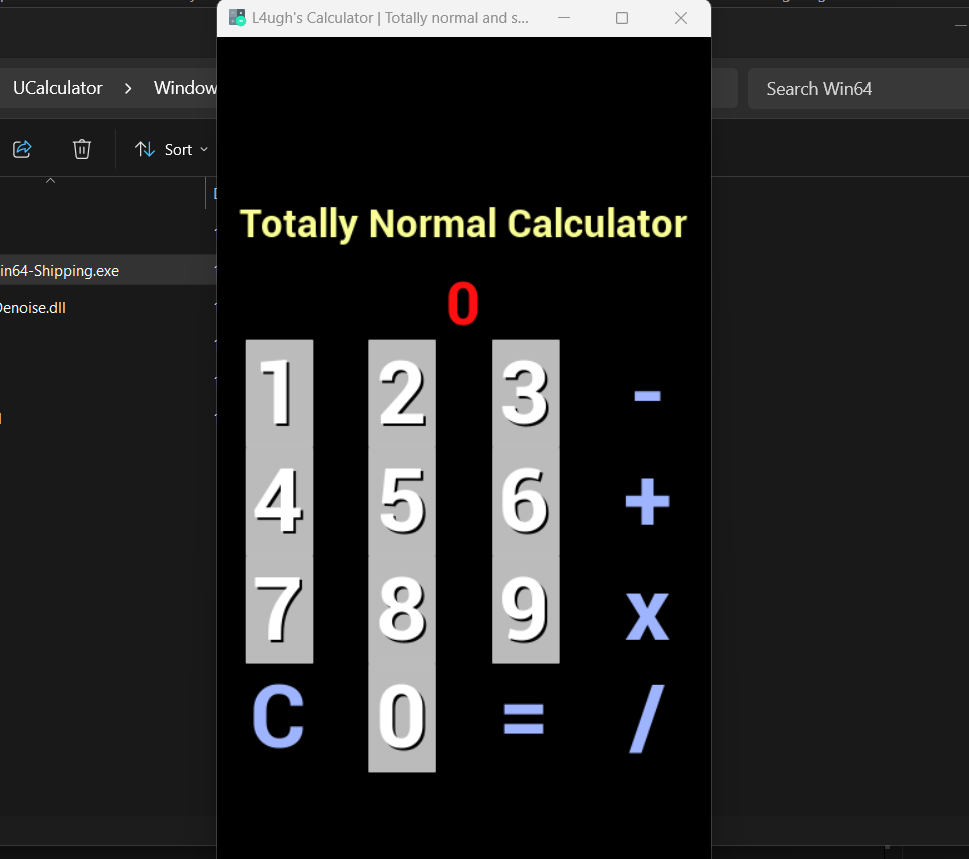
From the UI, it’s just a calculator with the basic operations.
But it must be hiding something inside, so we need to actually reverse the game’s code.
Unreal Engine Internals & Tools
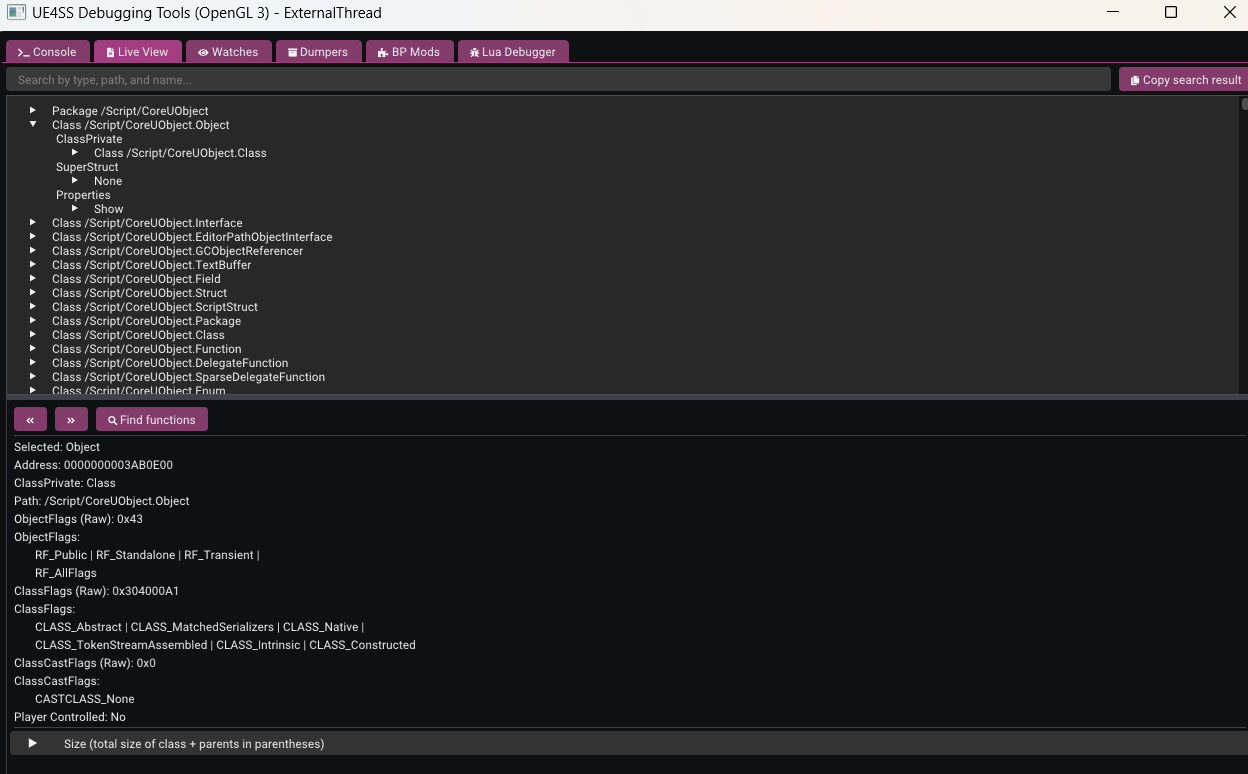
Before diving into tools/dumpers, we must understand how Unreal Engine manages its data. Unlike standard C++ applications where variable names and structures are lost after compilation, Unreal Engine maintains a Reflection System—a massive internal dictionary of every object, class, function, and variable name.
To reverse the game, we primarily hunt for three global variables in memory:
- GNames: A global list containing every string name used in the Engine (e.g., “Health”, “Ammo”, “Player”).
- GObjects (GUObjectArray): A massive array containing every active object instance in the game.
- GWorld: The root object representing the game world map. It works as our entry point to access the current level, actors (players, NPCs), and the overall game state.
By finding the memory addresses of GNames and GObjects, we can traverse the entire game logic and reconstruct the original class structures. This reconstructed map is called an SDK (Software Development Kit).
Tools like Dumper7, UE4SS, and UEDumper automate this process. They locate these internal globals and generate readable C++ header files, essentially turning raw memory addresses back into human-readable code like Player->Health.
I prefer using UE4SS or UEDUmper because they have an amazing Live View feature resulting in an experience similar to “Inspect Element” in web browsers or a real debugger. It lets us explore the game object hierarchy and modify variables while the game is running in forms of class based structures.
For UEDumper you need to manually get GWorld, GObjects, GNames. You can do that by following this tutorial.
I’ll be mainly using UE4SS here.
First Actual Look
After correctly configuring UE4SS, launching the game will trigger a new window to open, displaying the tool’s interface with several tabs.
I won’t be covering every feature of the tool—I’ll leave that for you to explore—but we will focus on the specific features that are relevant to solving this challenge.
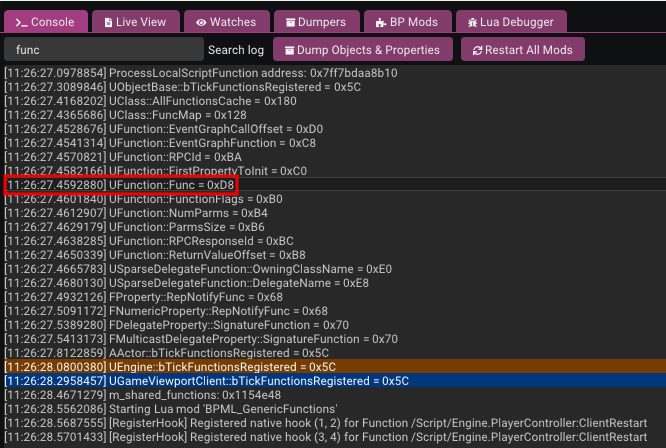
First tab we can see is the console which just prints some offsets and shows the tool loading process and prints some offset ( we will need that later )
Second tab which is the most important for us is the Live View
it allows us to search for any active object instances in the game memory. We can search for classes, verify if they are spawned, and even edit their variables in real-time.
Let’s start by searching for the project name so we can view all the classes related to the challenge and ignore engine related functions. Searching for ez_chall brings up the project’s main classes.
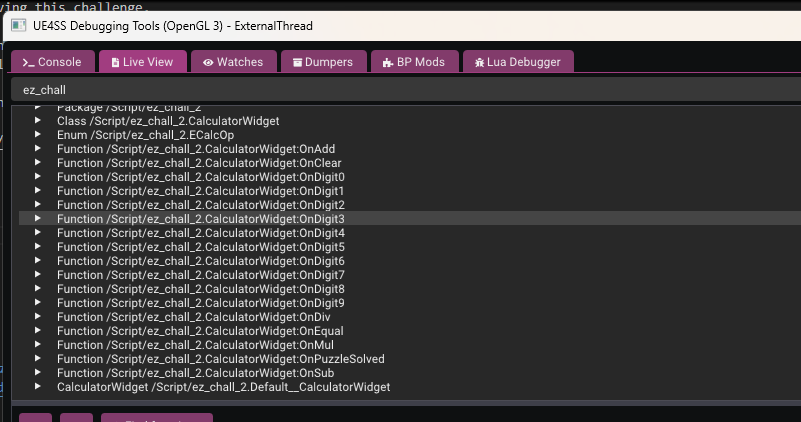
Among the results, we notice the CalculatorWidget class which seems to contain all the calculator logic functions like OnAdd, OnEqual, OnPuzzleSolved, etc.
Clicking on any one shows the address of the function and also tells us its type (native or blueprint as example)
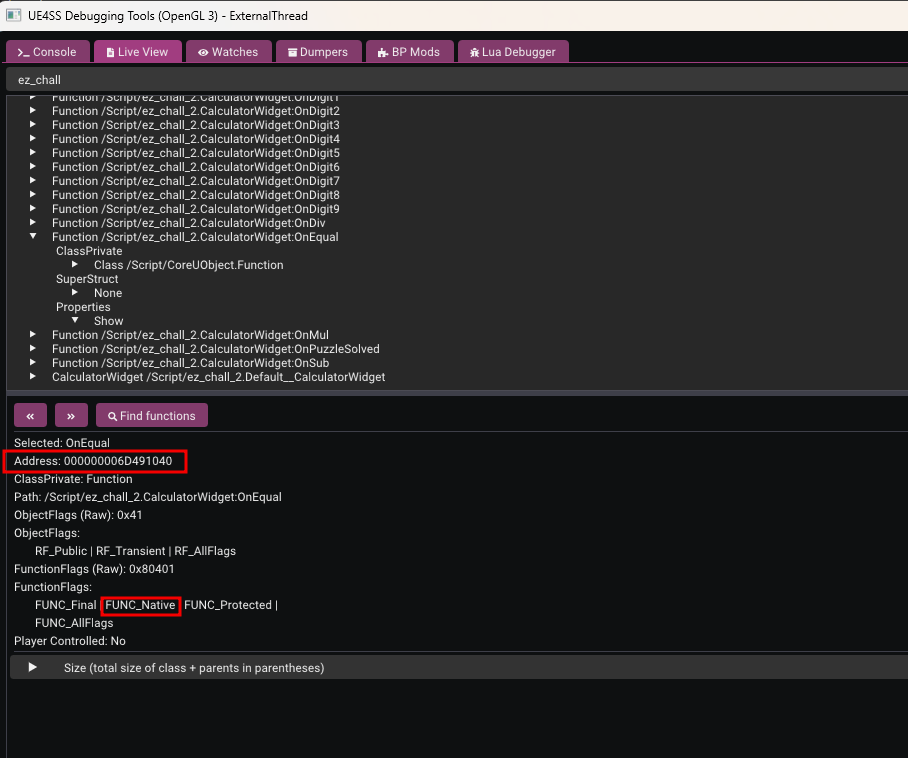
so we now know the address of OnEqual function , let’s open IDA, and attach a debugger, and try to navigate to this address
it’s better to turn off auto analysis so IDA can start faster
However, navigating to this address in IDA leads us to UFunction::vftable instead of the actual function code. Why is that?
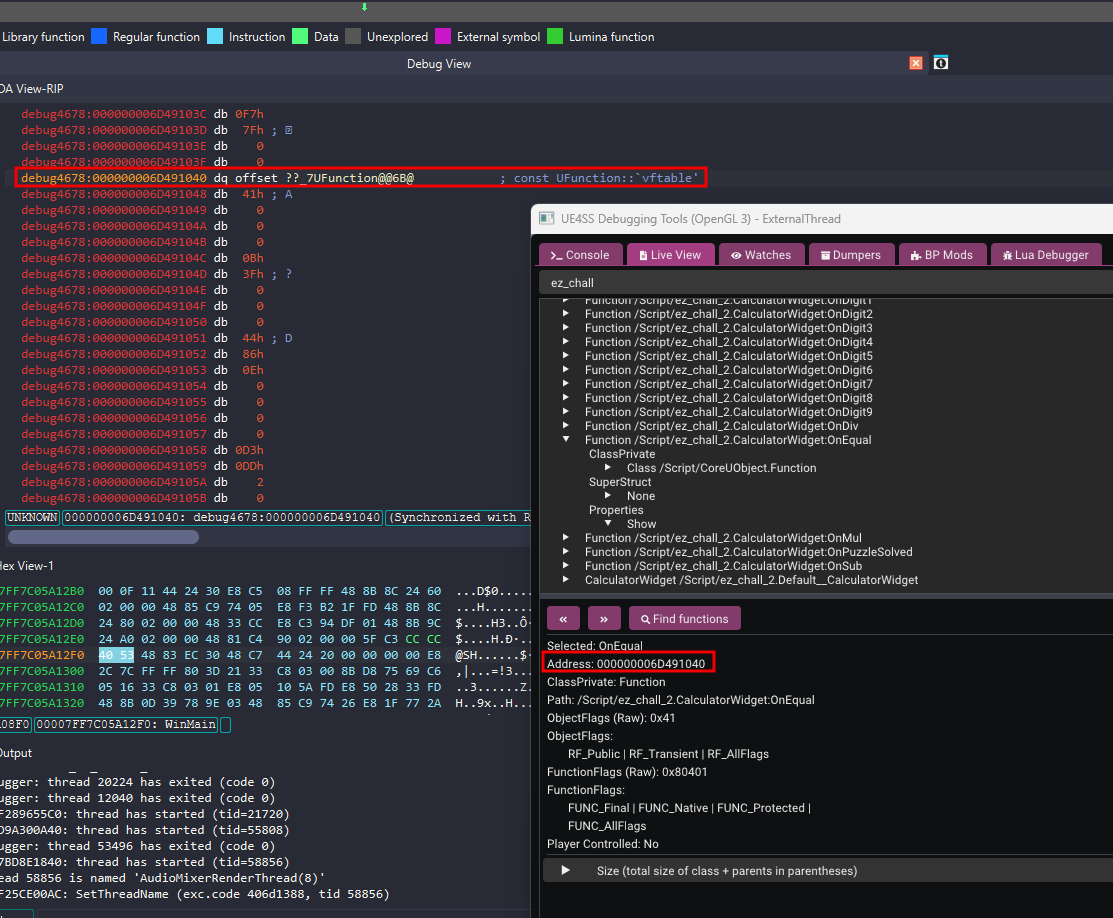
The UFunction Object vs. Native Code
Unreal Engine represents everything as objects, including functions. The address we found in UE4SS is the address of the UFunction Object in memory—the data structure describing the function—not the address of the actual compiled machine code.
Since UFunction is a C++ class with virtual functions, the first thing stored at its memory address is the pointer to its vftable (Virtual Function Table). This table handles dynamic dispatch, allowing the engine to call the correct function implementations at runtime. This is why IDA identifies the start of the object as the vftable.
To find the actual executable code (the Native Function), we need to look deeper into this UFunction structure. Specifically, we are looking for a member variable (often named Func or FuncPtr) that stores the pointer to the actual native implementation.
In the SDK or property dump, this is often at a specific offset (e.g., 0xE0). If we view the memory of this UFunction object in IDA or a memory viewer, we will see a pointer further down that points to the .text section (the executable code). That is where the logic for OnEqual actually lives.
so, do you remember the Console tab we glanced at earlier? This is where it becomes crucial. UE4SS conveniently reports the Func offset during initialization. In this version of the engine, the offset is reported as 0xD8.
So, to find the address of the executable code, we simply add this offset to our UFunction object address: 0x000000006D491040 + 0xD8
Navigating to this calculated address in IDA brings us to the code:
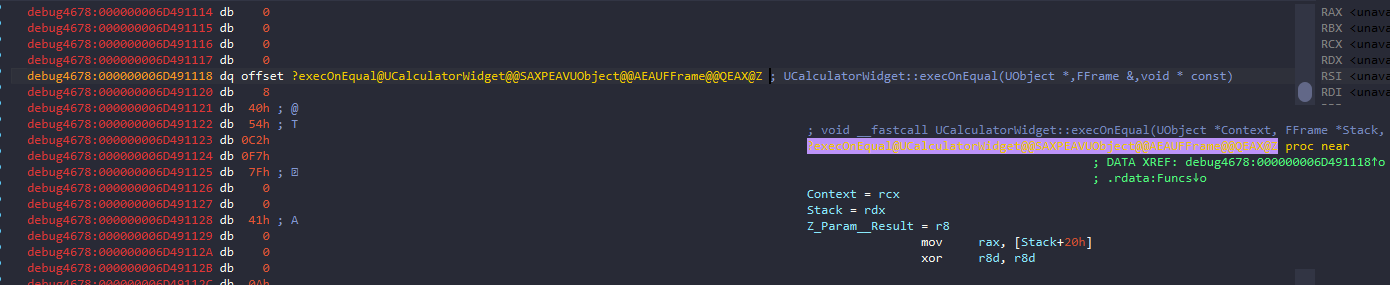
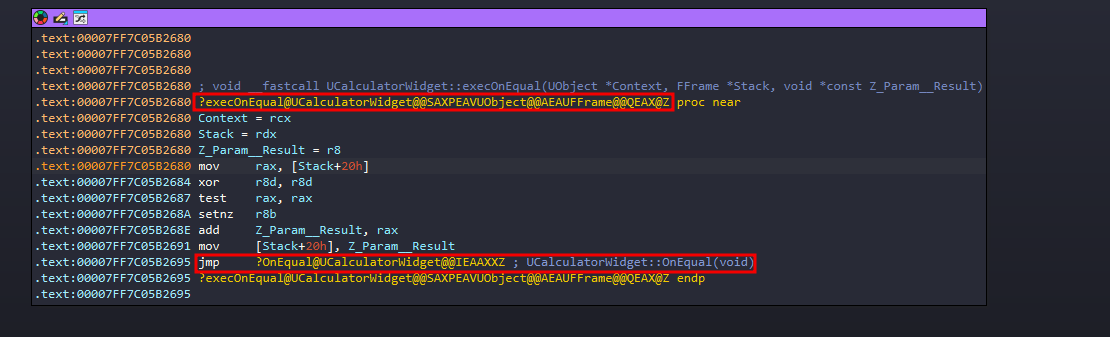
Note: The code found at this address is often the “exec” wrapper (or thunk), not the core logic. This wrapper handles retrieving parameters from the Blueprint stack before calling the actual C++ implementation. You’ll likely see a few setup instructions leading into a call to the real function—just follow that call to analyze the main logic.
Note: I’ve loaded the pdb in IDA so things can be clearer in write up, but everything can be done exactly the same even without
The Real Reverse Engineering
Finally we can find a real code to reverse, and in order to make IDA identify the section we are looking at and converting it to code we can now start the auto analysis around this address so it will be much faster now because we don’t need the whole binary.
I’ll walk through the code logic in the order it makes sense to reverse it: Input Handling -> Secret Mode -> Validation (The Math) -> Decryption.
1. Input Logic: SetOperator
The first thing to look at is how the calculator handles any operator button click ($+, -, *, /$). This function secretly handles the enabling of the “Secret Mode”.
1
2
3
4
5
6
7
8
9
10
11
12
13
14
15
16
17
18
19
20
21
22
23
24
25
26
27
28
29
30
31
32
33
34
35
36
37
38
39
40
41
42
43
44
45
46
47
48
49
50
51
52
53
54
55
void __fastcall UCalculatorWidget::SetOperator(UCalculatorWidget *this, ECalcOp NewOp)
{
  char v2; // si
  __int64 StoredValue; // rcx
  int *p_CurrentValue; // rax
  bool v6; // cl
  char v7; // al
  TArray<__int64,TSizedDefaultAllocator<32> > *p_CollectedMatrix; // rcx
  _BYTE *PendingOp; // rdi

  v2 = NewOp;
  if ( !this->bHasError )
  {
    if ( this->bInSecretMode )
    {
      v7 = 1;
      if ( !((this->CollectedMatrix.ArrayNum + 1) % this->SecretMatrixSize) )
        v7 = 4;
      if ( (_BYTE)NewOp == v7 )
      {
        UCalculatorWidget::ProcessSecretInput(this, (ECalcOp)(unsigned __int8)NewOp);
      }
      else
      {
        p_CollectedMatrix = &this->CollectedMatrix;
        this->bInSecretMode = 0;
        this->CollectedMatrix.ArrayNum = 0;
        if ( this->CollectedMatrix.ArrayMax )
          TArray<__int64,TSizedDefaultAllocator<32>>::ResizeTo(p_CollectedMatrix, 0);
      }
    }
    else
    {
      StoredValue = this->StoredValue;
      p_CurrentValue = (int *)&this->CurrentValue;
      v6 = (unsigned __int64)(StoredValue - 1) <= 8 && *(_QWORD *)p_CurrentValue == StoredValue;
      if ( (_BYTE)NewOp == Strong && this->PendingOp[0] == 3 && v6 )
      {
        this->SecretMatrixSize = *p_CurrentValue;
        this->bInSecretMode = 1;
        this->CollectedMatrix.ArrayNum = 0;
        if ( this->CollectedMatrix.ArrayMax )
          TArray<__int64,TSizedDefaultAllocator<32>>::ResizeTo(&this->CollectedMatrix, 0);
      }
    }
    PendingOp = this->PendingOp;
    if ( this->bStartNewEntry || !*PendingOp )
      this->StoredValue = this->CurrentValue;
    else
      UCalculatorWidget::ComputeEquals(this);
    *PendingOp = v2;
    this->bStartNewEntry = 1;
    this->bIsNegativeEntry = 0;
  }
}
The “Secret Mode” Trigger: Looking at the else block (when not in secret mode), we see the condition to enable it: if ( NewOp == Strong && PendingOp == 3 && v6 )
v6checks thatCurrentValue == StoredValueand is between 1-9.PendingOp == 3which confirms that the Pending Operation must beMul(Multiplication or*).
The variable Strong in the condition compares against NewOp. Strong (ignore name) is the constant value 1. By checking the ECalcOp Enum in UE4SS, we can verify what this value represents.
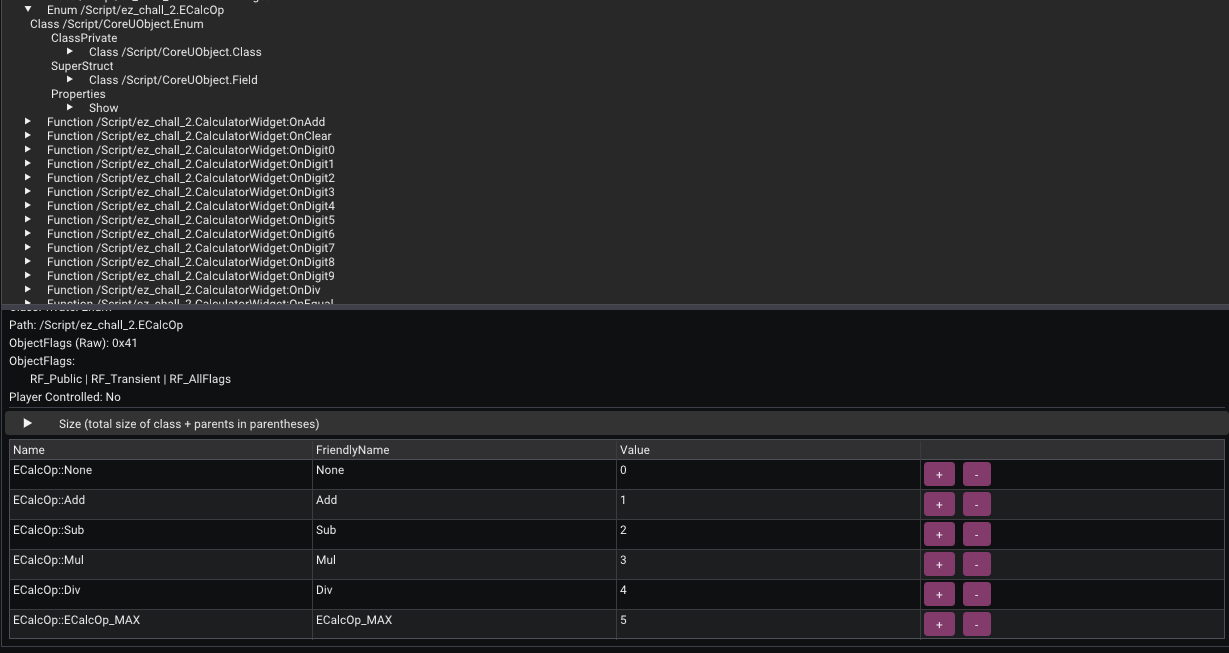 ECalcOp Enum definition in UE4SS
As seen in the screenshot, Add corresponds to index 1. This definitively confirms that Strong refers to the Add operator (+).
And also rest of the operations corresponding index are mentioned.
So the sequence to enable Secret Mode is: Input N -> Press * -> Input N -> Press +. For example: 3 * 3 +. This sets SecretMatrixSize to 3 and enables bInSecretMode.
The Input Format: Once in SecretMode, the input logic changes. The code expects specific operators as delimiters:
v7 = 1which corresponds toAdd(+) between numbers in the same row.v7 = 4which corresponds toDiv(/) when(Count + 1) % 3 == 0(The end of a row).
So to input our matrix, we need this pattern: Num + Num + Num / Num + Num ...
2. Collecting Data: ProcessSecretInput
This function is called by SetOperator when the correct delimiter is pressed in Secret Mode. It simply saves the CurrentValue into the matrix array.
1
2
3
4
5
6
7
8
9
10
11
12
13
14
15
16
void __fastcall UCalculatorWidget::ProcessSecretInput(UCalculatorWidget *this, ECalcOp TriggerOp)
{
  TArray<__int64,TSizedDefaultAllocator<32> > *p_CollectedMatrix; // rbx
  __int64 ArrayNum; // rdi
  __int64 CurrentValue; // rsi

  p_CollectedMatrix = &this->CollectedMatrix;
  ArrayNum = this->CollectedMatrix.ArrayNum;
  CurrentValue = -this->CurrentValue;
  if ( !this->bIsNegativeEntry )
    CurrentValue = this->CurrentValue;
  this->CollectedMatrix.ArrayNum = ArrayNum + 1;
  if ( (unsigned int)(ArrayNum + 1) > this->CollectedMatrix.ArrayMax )
    TArray<__int64,TSizedDefaultAllocator<32>>::ResizeGrow(&this->CollectedMatrix, ArrayNum);
  *(_QWORD *)&p_CollectedMatrix->AllocatorInstance.Data[8 * ArrayNum] = CurrentValue;
}
3. Triggering Validation: OnEqual
Finally, when we press =, OnEqual is called. If we are in Secret Mode, it adds the last number to the matrix (since the delimiters only added the previous ones) and calls validation.
1
2
3
4
5
6
7
8
9
10
11
12
13
14
15
16
17
18
19
void __fastcall UCalculatorWidget::OnEqual(UCalculatorWidget *this)
{
  __int64 ArrayNum; // rbp
  __int64 CurrentValue; // rsi

  if ( !this->bInSecretMode )
    goto LABEL_7;
  ArrayNum = this->CollectedMatrix.ArrayNum;
  CurrentValue = -this->CurrentValue;
  if ( !this->bIsNegativeEntry )
    CurrentValue = this->CurrentValue;
  this->CollectedMatrix.ArrayNum = ArrayNum + 1;
  if ( (unsigned int)(ArrayNum + 1) > this->CollectedMatrix.ArrayMax )
    TArray<__int64,TSizedDefaultAllocator<32>>::ResizeGrow(&this->CollectedMatrix, ArrayNum);
  *(_QWORD *)&this->CollectedMatrix.AllocatorInstance.Data[8 * ArrayNum] = CurrentValue;
  if ( !UCalculatorWidget::ValidatePassword(this) )
LABEL_7:
    UCalculatorWidget::ComputeEquals(this);
}
4. The Math: ValidatePassword
This is where the math happens.
1
2
3
4
5
6
7
8
9
10
11
12
13
14
15
16
17
18
19
20
21
22
23
24
25
26
27
28
29
30
31
32
33
34
35
36
37
38
39
40
41
42
43
44
45
46
47
48
49
50
51
52
53
54
55
56
57
58
59
60
61
62
63
64
65
66
67
68
69
70
71
72
73
74
75
76
77
78
79
80
81
82
83
84
85
86
87
88
89
90
91
92
93
94
95
96
97
98
99
100
101
102
103
104
105
106
107
108
109
110
111
112
113
114
115
116
117
118
119
120
char __fastcall UCalculatorWidget::ValidatePassword(UCalculatorWidget *this)
{
  bool v1; // zf
  __int64 v3; // rdi
  __int64 v4; // rsi
  __int64 ArrayNum; // rbx
  __int64 v6; // rbx
  __int64 v7; // r9
  __int64 v8; // r10
  const __int64 *v9; // r8
  __int64 v10; // r11
  char *v11; // rcx
  __int64 v12; // rdx
  FScriptContainerElement *Data; // rdi
  int v14; // r9d
  FScriptContainerElement *v15; // r11
  __int64 v16; // r10
  int v17; // edx
  __int64 v18; // r8
  FScriptContainerElement *v19; // rax
  UTextBlock *Display_Password; // rdi
  void (__fastcall *SetText)(UTextBlock *, FText *__struct_ptr); // rbx
  __int64 v22; // rax
  char v23; // bl
  TArray<__int64,TSizedDefaultAllocator<32> > FinalResult; // [rsp+30h] [rbp-48h] BYREF
  TArray<__int64,TSizedDefaultAllocator<32> > TempResult; // [rsp+40h] [rbp-38h] BYREF
  FString v27; // [rsp+50h] [rbp-28h] BYREF
  _BYTE v28[16]; // [rsp+60h] [rbp-18h] BYREF

  v1 = this->SecretMatrixSize == 3;
  this->bInSecretMode = 0;
  if ( !v1 || this->CollectedMatrix.ArrayNum != 9 )
    return 0;
  v3 = 9;
  TempResult.AllocatorInstance.Data = 0;
  *(_QWORD *)&TempResult.ArrayNum = 0;
  TArray<__int64,TSizedDefaultAllocator<32>>::ResizeTo(&TempResult, 9);
  v4 = 9;
  do
  {
    ArrayNum = TempResult.ArrayNum;
    if ( ++TempResult.ArrayNum > (unsigned int)TempResult.ArrayMax )
      TArray<__int64,TSizedDefaultAllocator<32>>::ResizeGrow(&TempResult, ArrayNum);
    *(_QWORD *)&TempResult.AllocatorInstance.Data[8 * ArrayNum] = 0;
    --v4;
  }
  while ( v4 );
  UCalculatorWidget::MultiplyMatrices(this, &this->CollectedMatrix, this->H1, &TempResult, 3);
  FinalResult.AllocatorInstance.Data = 0;
  *(_QWORD *)&FinalResult.ArrayNum = 0;
  TArray<__int64,TSizedDefaultAllocator<32>>::ResizeTo(&FinalResult, 9);
  do
  {
    v6 = FinalResult.ArrayNum;
    if ( ++FinalResult.ArrayNum > (unsigned int)FinalResult.ArrayMax )
      TArray<__int64,TSizedDefaultAllocator<32>>::ResizeGrow(&FinalResult, v6);
    *(_QWORD *)&FinalResult.AllocatorInstance.Data[8 * v6] = 0;
    --v3;
  }
  while ( v3 );
  v7 = 0;
  v8 = -1016LL - (_QWORD)this;
  do
  {
    v9 = &this->H2[3];
    v10 = 3;
    do
    {
      v11 = (char *)v9 + v8;
      v12 = *(_QWORD *)&TempResult.AllocatorInstance.Data[v7] * *(v9 - 3)
          + *v9 * *(_QWORD *)&TempResult.AllocatorInstance.Data[v7 + 8]
          + v9[3] * *(_QWORD *)&TempResult.AllocatorInstance.Data[v7 + 16];
      ++v9;
      *(_QWORD *)&v11[(unsigned __int64)FinalResult.AllocatorInstance.Data] = v12;
      --v10;
    }
    while ( v10 );
    v7 += 24;
    v8 += 24;
  }
  while ( v7 < 72 );
  Data = FinalResult.AllocatorInstance.Data;
  v14 = 0;
  v15 = FinalResult.AllocatorInstance.Data;
  v16 = 0;
  while ( 2 )
  {
    v17 = 0;
    v18 = 0;
    v19 = v15;
    do
    {
      if ( *(_QWORD *)v19 != (v14 == v17) )
      {
        v23 = 0;
        goto LABEL_25;
      }
      ++v17;
      ++v18;
      v19 += 8;
    }
    while ( v18 < 3 );
    ++v14;
    ++v16;
    v15 += 24;
    if ( v16 < 3 )
      continue;
    break;
  }
  // ... Error handling omitted ...
  UCalculatorWidget::AttemptDecryption(this);
  Data = FinalResult.AllocatorInstance.Data;
  v23 = 1;
LABEL_25:
  if ( Data )
    FMemory::Free(Data);
  if ( TempResult.AllocatorInstance.Data )
    FMemory::Free(TempResult.AllocatorInstance.Data);
  return v23;
}
Explanation: The function performs: Result = CollectedMatrix * H1 * H2. Then it checks if Result is an Identity Matrix.
So we need to find an input matrix M such that: M * (H1 * H2) = I which means M is the inverse of (H1 * H2).
But wait, where do H1 and H2 come from? These matrices are hardcoded into the game. We need to find where they are initialized in the binary.
In Unreal Engine, this often happens in the Class Default Object (CDO) or inside the class constructor.
Without symbols, you can find this logic by:
- Debugging until the array is accessed cause it will be already initialized ( and that’s the easy method )
- Trace back the offset or the memory address of the array until you find which function will access it and initialize the hardcoded values inside
- Looking for a block of code moving constant values into memory offsets (specifically matching the layout of two 3x3 arrays).
We can strip the binary and look at the assembly. Here is what the initialization looks like:
 Initialization of H1 and H2 in the InternalConstructor
You can clearly see two blocks of moves initializing the matrix values at offsets (like 0x398, 0x3A0, etc.).
5. The Final Decryption: AttemptDecryption
If the math is correct, this function decrypts the flag.
1
2
3
4
5
6
7
8
9
10
11
12
13
14
15
16
17
18
19
20
21
22
23
24
25
26
27
28
29
30
31
32
33
34
35
36
37
38
39
40
41
42
43
44
45
46
47
48
49
50
51
52
53
54
55
56
57
58
59
60
61
62
63
64
65
66
67
68
69
70
71
72
73
74
75
76
77
78
79
80
81
82
83
84
85
86
87
88
89
90
91
92
93
94
95
96
97
98
99
100
101
102
103
void __fastcall UCalculatorWidget::AttemptDecryption(UCalculatorWidget *this)
{
  int v2; // ebx
  __int64 v3; // rsi
  int v4; // r8d
  FScriptContainerElement *Data; // rbx
  struct FString *v6; // rax
  bool v7; // cf
  unsigned int v8; // r8d
  unsigned __int64 v9; // rdx
  FScriptContainerElement *v10; // rdx
  FString FilePath; // [rsp+20h] [rbp-60h] BYREF
  TArray<unsigned char,TSizedDefaultAllocator<32> > IV; // [rsp+30h] [rbp-50h] BYREF
  TArray<unsigned char,TSizedDefaultAllocator<32> > FileData; // [rsp+40h] [rbp-40h] BYREF
  FString PassString; // [rsp+50h] [rbp-30h] BYREF
  TArray<unsigned char,TSizedDefaultAllocator<32> > Decrypted; // [rsp+60h] [rbp-20h] BYREF
  TArray<unsigned char,TSizedDefaultAllocator<32> > Key; // [rsp+70h] [rbp-10h] BYREF

  FString::PrintfImpl(&PassString, L"%dx%d", (unsigned int)this->SecretMatrixSize, (unsigned int)this->SecretMatrixSize);
  v2 = 0;
  if ( this->CollectedMatrix.ArrayNum > 0 )
  {
    v3 = 0;
    do
    {
      FString::PrintfImpl(
        (struct FString *)&Decrypted,
        L"+%lld",
        *(_QWORD *)&this->CollectedMatrix.AllocatorInstance.Data[v3]);
      if ( Decrypted.ArrayNum )
        v4 = Decrypted.ArrayNum - 1;
      else
        v4 = 0;
      FString::AppendChars(&PassString, (const wchar_t *)Decrypted.AllocatorInstance.Data, v4);
      if ( Decrypted.AllocatorInstance.Data )
        FMemory::Free(Decrypted.AllocatorInstance.Data);
      if ( v2 == this->CollectedMatrix.ArrayNum - 1 )
      {
        FString::AppendChars(&PassString, L"=", 1);
        ++v2;
      }
      else if ( !(++v2 % this->SecretMatrixSize) )
      {
        FString::AppendChars(&PassString, L"/", 1);
      }
      v3 += 8;
    }
    while ( v2 < this->CollectedMatrix.ArrayNum );
  }
  SimpleCrypto::Sha256String(&Key, &PassString);
  Data = Key.AllocatorInstance.Data;
  IV.AllocatorInstance.Data = 0;
  *(_QWORD *)&IV.ArrayNum = 16;
  TArray<unsigned char,TSizedDefaultAllocator<32>>::ResizeGrow(&IV, 0);
  *(_OWORD *)IV.AllocatorInstance.Data = *(_OWORD *)Data;
  v6 = FPaths::ProjectContentDir((struct FString *)&Decrypted);
  v7 = v6->Data.ArrayNum != 0;
  FilePath.Data.AllocatorInstance.Data = v6->Data.AllocatorInstance.Data;
  v6->Data.AllocatorInstance.Data = 0;
  v8 = 30 - v7;
  FilePath.Data.ArrayNum = v6->Data.ArrayNum;
  FilePath.Data.ArrayMax = v6->Data.ArrayMax;
  *(_QWORD *)&v6->Data.ArrayNum = 0;
  v9 = v8 + FilePath.Data.ArrayNum;
  if ( (int)v9 < FilePath.Data.ArrayNum )
  {
    UE::Core::Private::OnInvalidArrayNum((UE::Core::Private *)v8, v9);
    JUMPOUT(0x7FF6729C2B03LL);
  }
  if ( (v9 & 0x80000000) != 0LL )
  {
    UE::Core::Private::OnInvalidArrayNum((UE::Core::Private *)(unsigned int)v9, v9);
    __debugbreak();
  }
  if ( (int)v9 > FilePath.Data.ArrayMax )
    TArray<FFloat16,TSizedDefaultAllocator<32>>::ResizeTo(&FilePath);
  FString::PathAppend(&FilePath, L"Secret/proprietary_asset.dat", 28);
  if ( Decrypted.AllocatorInstance.Data )
    FMemory::Free(Decrypted.AllocatorInstance.Data);
  v10 = (FScriptContainerElement *)&chText;
  FileData.AllocatorInstance.Data = 0;
  if ( FilePath.Data.ArrayNum )
    v10 = FilePath.Data.AllocatorInstance.Data;
  *(_QWORD *)&FileData.ArrayNum = 0;
  if ( (unsigned __int8)FFileHelper::LoadFileToArray(&FileData, v10, 0) )
  {
    SimpleCrypto::DecryptAes256Cbc(&Decrypted, &FileData, &Key, &IV);
    if ( Decrypted.ArrayNum > 0 )
      UCalculatorWidget::BuildSecretMesh(this, &Decrypted);
    if ( Decrypted.AllocatorInstance.Data )
      FMemory::Free(Decrypted.AllocatorInstance.Data);
  }
  if ( FileData.AllocatorInstance.Data )
    FMemory::Free(FileData.AllocatorInstance.Data);
  if ( FilePath.Data.AllocatorInstance.Data )
    FMemory::Free(FilePath.Data.AllocatorInstance.Data);
  if ( IV.AllocatorInstance.Data )
    FMemory::Free(IV.AllocatorInstance.Data);
  if ( Key.AllocatorInstance.Data )
    FMemory::Free(Key.AllocatorInstance.Data);
  if ( PassString.Data.AllocatorInstance.Data )
    FMemory::Free(PassString.Data.AllocatorInstance.Data);
}
It reconstructs the operation string (e.g., 3x3+1+2+3/+4+5+6/+7+8+9) and uses its SHA256 hash as the AES key to decrypt proprietary_asset.dat.
First Phase Solution
And yes, that’s just the first phase XD, but let’s continue.
Steps to Solve:
- Get H1 and H2: Extract them from the
InternalConstructorassembly or dump them from memory. - Calculate Inverse: Use Python to compute
(H1 * H2)^-1. - Input the Matrix:
- Enable Secret Mode: Input
3, Press*, Input3, Press+. - Input Row 1:
Val1 + Val2 + Val3 / - Input Row 2:
Val4 + Val5 + Val6 / - Input Row 3:
Val7 + Val8 + Val9 =(Press=for the last one).
- Enable Secret Mode: Input
Solver Script
To get the secret key, we need to find the input matrix M, and just input the correct sequence to the game. Using basic linear algebra:
M * (H1 * H2) = I
Multiplying both sides by the inverse of (H1 * H2):
M = Inverse(H1 * H2)
Here is a Python solver script:
1
2
3
4
5
6
7
8
9
10
11
12
13
14
15
16
17
18
19
20
21
22
23
24
25
26
27
28
29
30
31
32
33
34
35
36
37
import numpy as np
H1_flat = [1, 4, -17, -45, -179, 809, 19, 113, 1306]
H2_flat = [1, 35, 26, -8, -279, -211, 13, 500, 202]

H1 = np.array(H1_flat, dtype=np.int64).reshape(3, 3)
H2 = np.array(H2_flat, dtype=np.int64).reshape(3, 3)

H1_inv = np.linalg.inv(H1)
H2_inv = np.linalg.inv(H2)

Password_Matrix = np.dot(H2_inv, H1_inv)

Password_Matrix = np.rint(Password_Matrix).astype(np.int64)

#print(Password_Matrix)
#print("\n" + "="*40 + "\n")

flat_code = Password_Matrix.flatten()

#print("3 * 3 +")

output_sequence = ""

for i, num in enumerate(flat_code):

    if i == len(flat_code) - 1:
        operator = " ="
    elif (i + 1) % 3 == 0:
        operator = " / "
    else:
        operator = " + "

    output_sequence += f"{num}{operator}"

    # Print clear instructions
    #print(f"{num}\t '{operator.strip()}'")
print("3 * 3 + " + output_sequence)
3 * 3 + 15540659388 + 341454773 + -9223355 / -356402029 + -7830760 + 211524 / -117958214 + -2591743 + 70008 =
Once we enter the correct password, the calculator UI disappears, and we find ourselves in a room with text on the wall telling us we “just need to pass the wall” to get the flag.
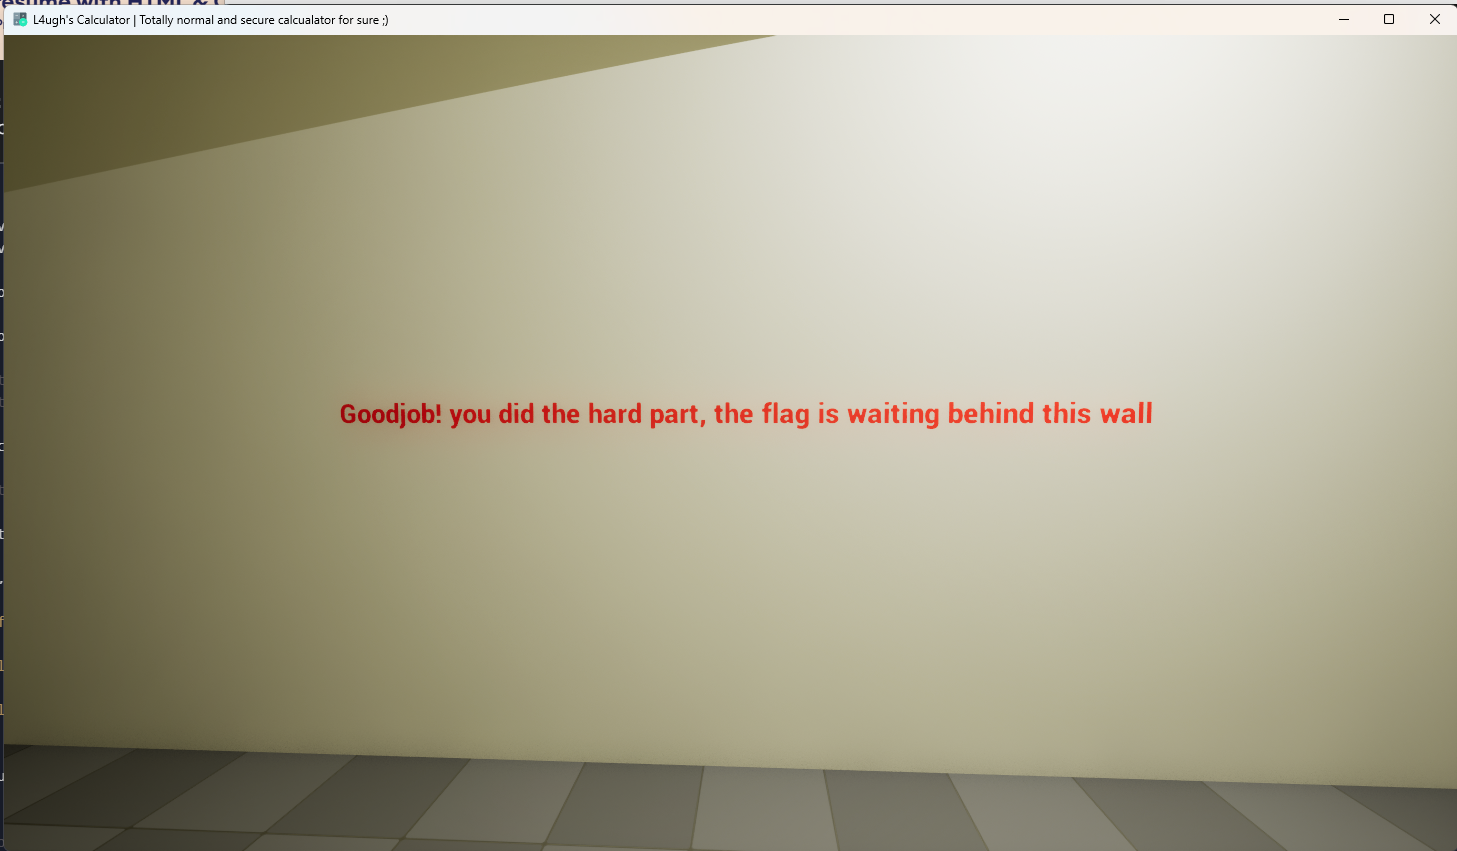
So, how do we cheat physics?
Final Step: Wallhack
And this is phase 2.
There are many ways to approach this (hooking movement functions, teleporting, etc.), but the easiest way is to disable the collision that stops us from moving through the wall.
Since we already have UE4SS hooked, we can modify the player’s properties at runtime to directly disable collision.
Find the Collision Component: In the UE4SS Live View, search for
CollisionComponent. We want to filter for Object Instances only (uncheck the other boxes) because we want to modify the specific player currently spawned in the level, not the class template (CDO).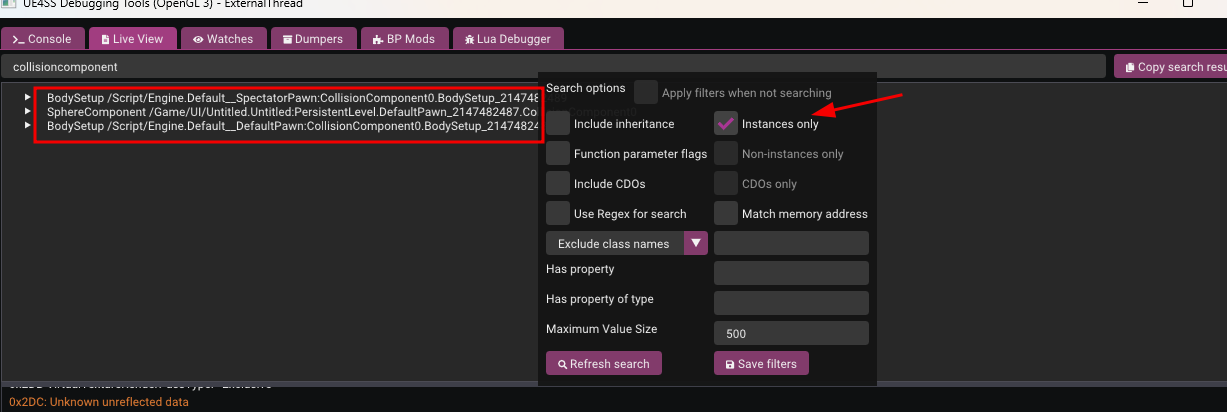
Select the Component: You might see results for
BodySetup(which stores static mesh data) and components likeSphereComponent. We choose theSphereComponentbecause in this game’s Pawn, the Sphere Component is the root component responsible for handling physical collision detection.Disable Collision: Click on the component to view its properties. Scroll down to find the
BodyInstancestruct property and expand it. Inside, look forCollisionEnabled.Currently, it is set to
QueryAndPhysics(which means it blocks movement and generates overlap events).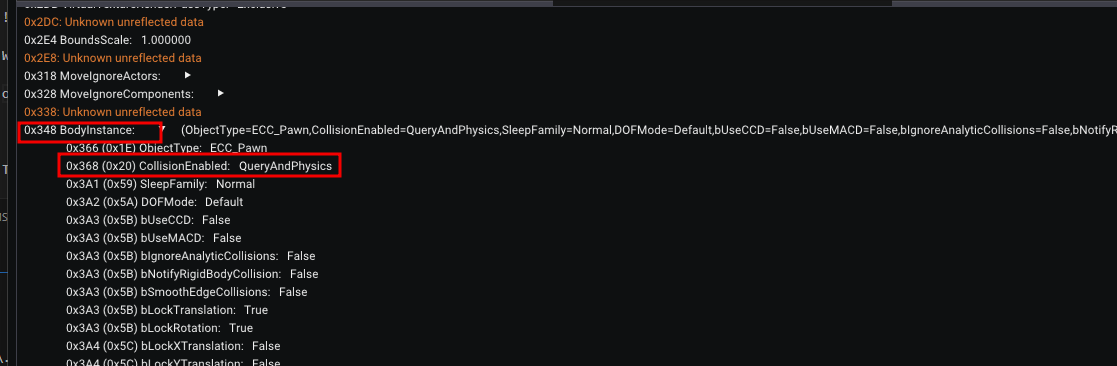
Walk Through Walls: Change this value to
NoCollision.Now, simply walk forward. You will phase right through the wall to the secret area!
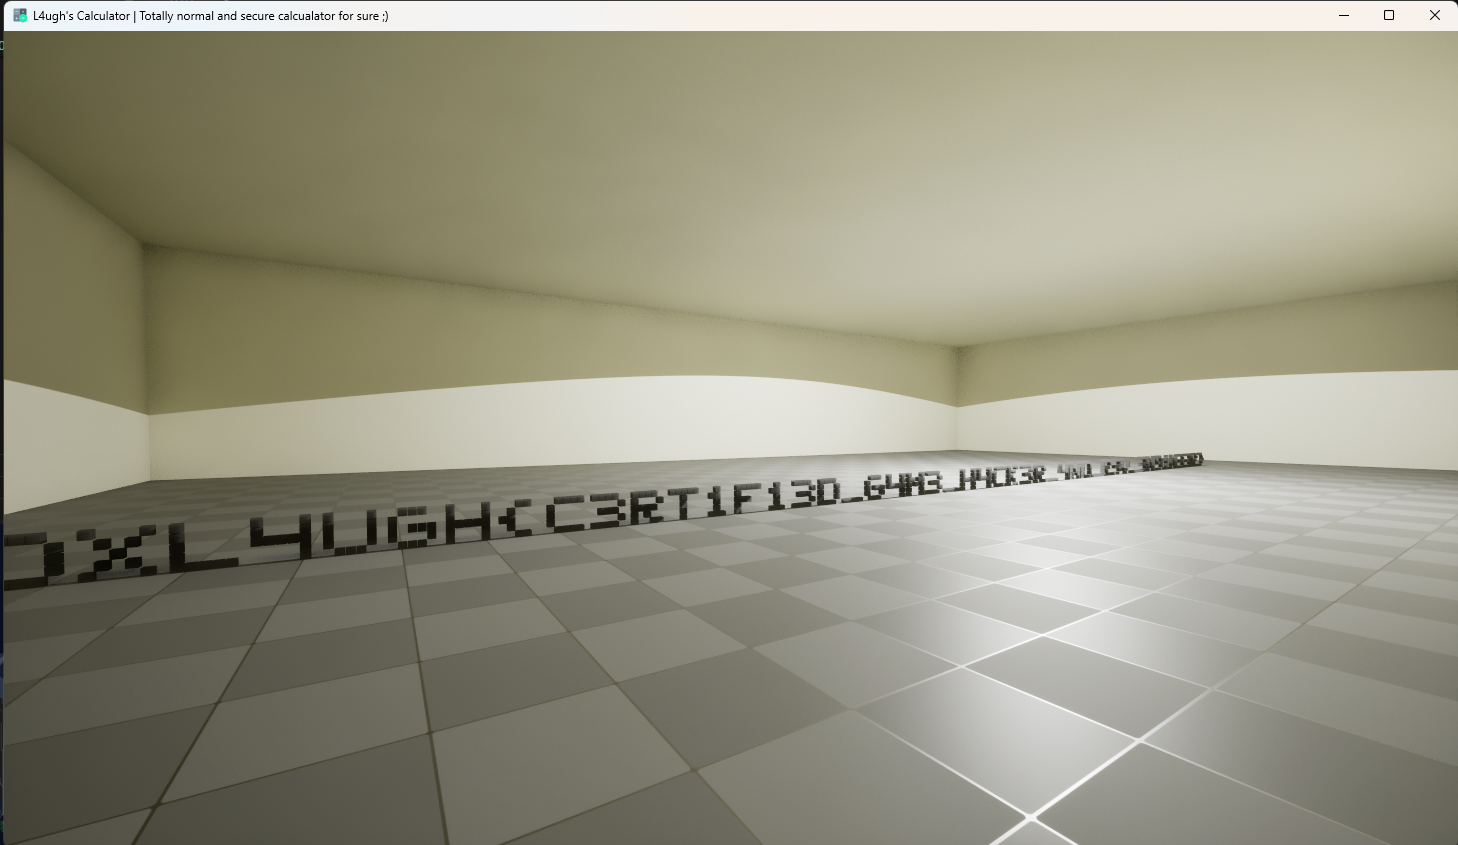
And there is our flag :)
Alternative Solution
While the solution above represents the intended path with the most educational value regarding game logic and reverse engineering, there is a quicker method that allows you to bypass Phase 2 entirely.
Remember the .pak files we discussed earlier?
In this challenge, I encrypted the project’s .pak file to protect the assets. However, since the game client must be able to decrypt these assets at runtime to load them, the decryption key must reside somewhere within the binary.
In Unreal Engine, locating this key is a standard procedure. There are several tools available to automate this, and you can find a comprehensive guide on identifying the key manually here: UE4 AES Key Extracting Guide.
For this walkthrough, we will use the AES Key Finder tool mentioned in the guide.
The tool scans the binary for patterns characteristic of UE4 AES keys. It might output several candidates, so you may need to test them. In our case, the first result was the correct one.
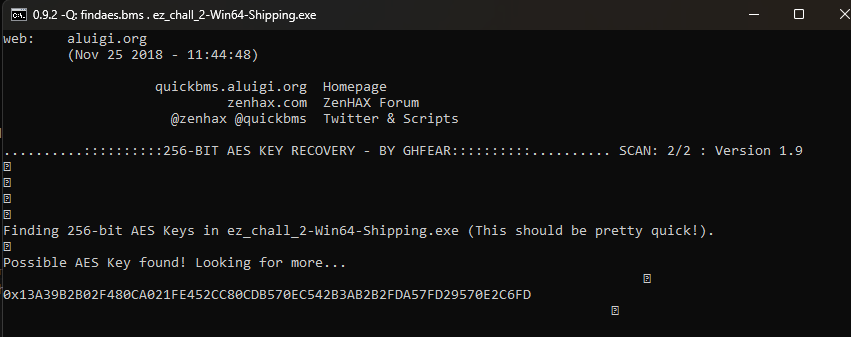
With the encryption key in hand, we can use a viewer tool to inspect the contents of the .pak file. A reliable choice is UnrealPakViewer.
After entering the key, we can navigate through the file structure and view all game assets directly.
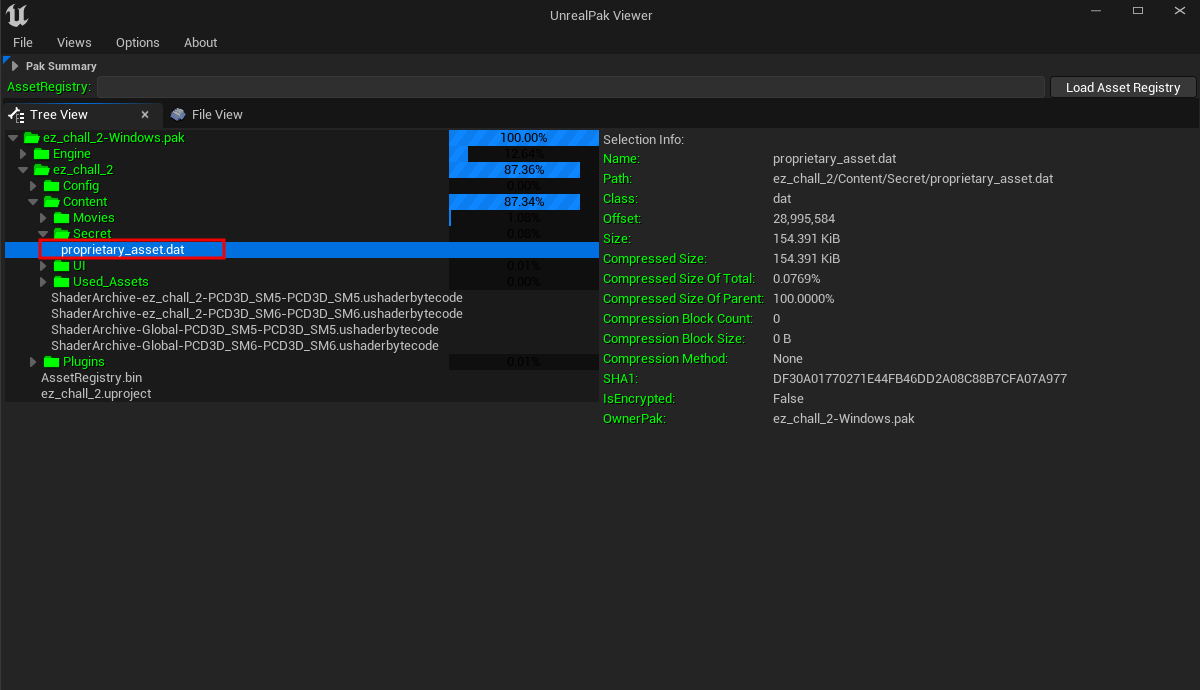
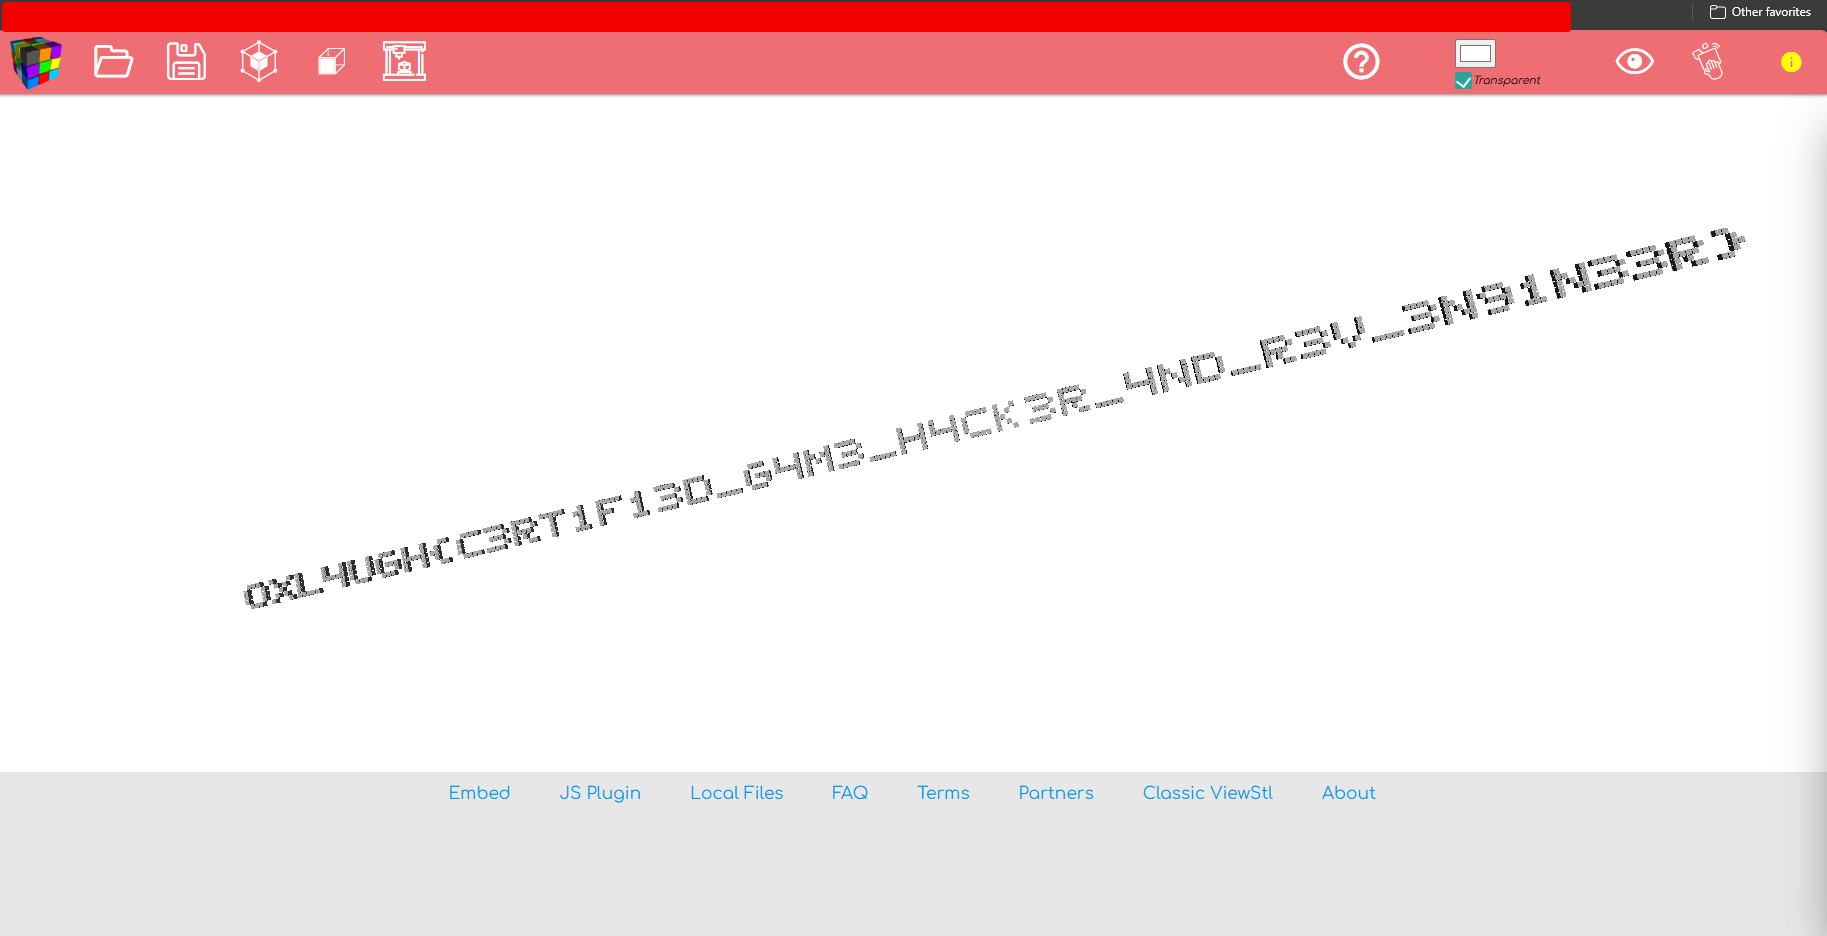
From here, we can locate the secret mesh file (Secret), extract it, and decrypt it. Opening the extracted model in any 3D viewer reveals the flag mesh directly.
Final Words
The write up is pretty speed up, But I’ll make sure to update it in more details very soon (with a plan to publish an Arabic version).
Thank you for reading, and I hope you found it helpful, learned some new stuff, and enjoyed solving the challenge.
If you have any questions or comments, feel free to contact me on LinkedIn – Discord – GitHub